Showing posts with label two-string bass. Show all posts

Sunday, 25 July 2010

Mahogany sides for the T-beam

Almost a year ago I mentioned the mahogany sides that I was going to make for the two string T-beam bass. They're coming along slowly, but they're far enough to be shown here.

The main thing is the added mahogany sides. But another thing I've done is rounding off the corners and edges of the T-beam and tuner plate. It makes it look a bit more friendly and playable without the sharp edges.
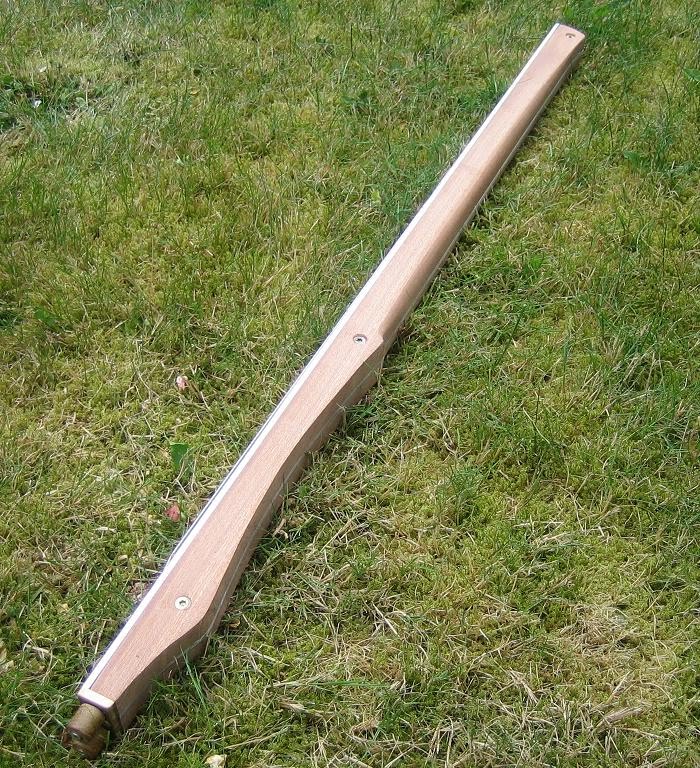

The lower bottom of the beam is curved in order to follow the shape of the acrylic body. I plan to make another body from a thicker (5 mm) piece of acrylic. It will look a lot like the current one but it is going to have two thigh rests like the Strandberg guitars, which gives a wider variety of playing positions.

I used a surform rasp, belt sander and sand paper. Plus a table router for the inside cavities for tuners, saddles, etc. On the bottom image, you can see burns and tearoffs from the routing, but luckily they're hidden when the bass is assembled. I also bought a spokeshave, but found it difficult to use. I'm slowly getting better at using the tools, but there's a long way to go before I'm going to be really satisfied with my craftsmanship.

Next steps are routing a channel in each side for the sliding pickup bracket, sanding a bit more, and oiling the wood. I'd like to give the pickup bracket a more elegant shape than it has now, so I might do some cutting and filing here, too. Then there's the acrylic body. Knowing myself and the speed at which I work, the body probably won't be finished this summer.

Sunday, 2 August 2009

To-do list - Status

I am having slow progress on the T-beam bass (remember the to-do list?). I have carved out the curves for neck and body on the aluminium beam using hacksaw and file. There is still some filing to do before I mount the mahogany sides, which will also have the same bottom shape as the T-beam.

Time to buy a decent plane and spokeshave.

And to learn to use them.

Thursday, 4 June 2009

To-do list

Nothing much has happened on my T-beam-bass lately. I've replaced the jack connector since the old one didn't work and clamped the connecting cable going from the jack more securely to the sliding bracket. Plus, I've borrowed a friend's bass to do some comparisons of sound, feel and ergonomics.

His is a 34" bass, and though the picture doesn't really show it, mine, with its 30" scale length, is much smaller and lighter.

My bass still isn't exactly pretty, but I do intend it to be so one day. But until now (and probably some time ahead as well), most of my focus is on experimentation rather than looks.

Nevertheless, in an attempt to convey an idea of what I expect it to become some day, here's a list of some of the things, I'd like to do next:

  • Make the saddles lengthwise adjustable for intonation, i.e. making slots for the saddles and fastening them with nuts.
  • Shape the neck as shown on the image . I have to modify the sole plate of my jigsaw to be able to do that.
  • Make a prettier and more ergonomic shield in 5 mm acrylic (that's approximately 0.2"). The current one is just 3 mm thick, and it's too fragile and flimsy looking.
  • Make mahogany sides rather than the current spruce ones. What's keeping me back here is that I'm not quite sure yet where the holes for the shield are going to be, and I'd rather keep the mahogany intact and experiment on the spruce.
  • Decide whether I like the sound of the vertical pickup. If so, I'll tidy up the bracket. If not, I'll buy a P-bass-pickup and use one half of that in a new bracket.

Friday, 8 May 2009

I am not alone

One of the good things about the T-beam bass or guitar is that it's fairly easy to build a functioning instrument and improve it from there. In spite of its relative simplicity, there's still lots of challenges in it. If you're ambitious, there's plenty of aspects to improve. If you're not, there's still the joy of building your own functioning, albeit crude instrument.

It's a really good project in many ways, but until recently, I thought I was the only one making a T-beam bass.

To my delight, as I discovered here, I am not the only one. Kaspar Torn is building one as well. It's still in its early stages, and so far, it looks very promising. As you can see from the pictures, it differs from my own project in a number of ways:

Strings are anchored in a bolt through the vertical flange

String slots and zero fret


Tuners upside down

Angled tuners


This project is going to be interesting to follow. Kaspar leaves many options open, such as a detachable acoustic body and a spike, allowing it to be played upright.

I will post updates as the project moves along.

Saturday, 4 April 2009

A body that preserves vibration

With the addition of a body to the T-beam bass, it begins to resemble an instrument.

The body is a 3 mm (around 1/8") acrylic (or plexiglass) shield, cut with a saw and an angle grinder, polished, and bent in shape with a hot air gun. As with almost everything else on the bass, it is not intended as the final version. For this, I will use thicker (probably 5 mm) acrylic sheet and have the leg rest further to the back.

The acrylic shield is slightly bowl-shaped so it follows the contours of my body. It's a fairly deep bowl shape ;-) It has a leg rest bent into the lower part and an arm rest created by folding back a wing on the upper part. It quite looks like the body of an Ovation Breadwinner, though that was not the intention originally. It's very comfortable, and I expect it to be even more so when I've moved back the leg rest.

The four mounting supports that connect the shield to the stick will have to be replaced with a central support mounted on one of the two places where the stick has least vibration. A so-called node. I located the node by suspending the stick on two springy foam blocks, pouring salt on the stick and tapping it with a knife handle. As predicted in the marimba literature, the salt would gather to show the location of the node. Luckily, the node is somewhere in between the mounting supports, which makes construction easy. BTW; marimba and vibraphone builders do a lot of interesting research into the acoustics and vibration of wood; something that the guitar builders might draw upon in their work.

The reason for having the shield mounts on the node is to preserve vibration in the stick and not have it travel through the body and into the all-absorbing torso of the player. The node does not vibrate - or at least it vibrates less than other areas of the stick, meaning that less vibrations will be transferred from this point to the shield than from any other areas. I expect it to have a pronounced effect on sustain, and perhaps also on tone.

Some sort of leaf spring suspension mount might give even better isolation between the shield and the stick, but that will have to wait for a later version.

Thursday, 19 March 2009

A sliding pickup

There has been several attempts - by for example Westone and more recently Norton Guitars - to make a pickup that can be moved to the areas of the strings where different antinodes and their corresponding overtones are located. This gives you the sound of a neck pickup, a bridge pickup and everything in between. Though only one at a time.

The T-beam bass and the bracket for the humbucker pickup were too obvious a candidate to not trying something like this. And since I allow myself an impulsive and unstructured approach to my hobbies, I gave it a try.

The pickup bracket has nylon cable clips screwed to it. The clips grip the edge of the T-beam top flange and allows the whole thing to be slid easily along the beam. It was necessary to isolate the pickup from the vibrations of the guitar body (hence the rubber bands and foam padding). If not, the vibration characteristics of the string on the pickup's location would be hardly audible compared to the much stronger body vibrations also received by the pickup. Isolating the pickup also significantly reduced the noise of the nylon clips sliding along the T-beam... nice, because now it is possible to slide the pickup "in-tone" and hear the subtle changes of the timbre of the string.

The bracket and pickup is big and heavy, so one of the next steps will be making a sliding bracket for the much smaller between-strings pickup, which I made earlier. The small pickup should also be better at sensing a small section of the string, where the humbucker due to its length picks up a lot of vibrations - including the unwanted ones. With the big pickup, you can easily hear the difference up and down the strings, but the effect isn't exactly striking. I hope and believe that the small one will do a better job.

I had to rout a channel in the wooden sides for the nylon clips. With everything on, in the afternoon sun, it looks like this:

Thursday, 5 March 2009

A vertical pickup

I made a pickup that sits vertically between the strings. Since the bass is two stringed, the pickup picks up one string from each side. It works well, but I have to keep it towards the bridge end, otherwise the strings will hit it.

It is made from an acrylic sewing machine bobbin wound (on a sewing machine) with a very thin copper wire: 0,05 mm which is somewhere in the neighbourhood of AWG44. This wire is thin as human hair and very prone to snapping... it happened more than once, but I've learned to handle the delicate wire.

I measured the DC resistance to 2,3 Kilo Ohm. I'm not sure how much I can deduct about its impedance from that information, but it's only around one fourth of the resistance of the humbucker that I used earlier.

The center of the bobbin contains a stack of small neodymium magnet discs and iron cylinders. This allows me to vary the magnetic force by replacing an iron disc with a magnet if I want it stronger - and vice versa, of course.

I can rest my hand on the pickup while playing, but sometimes it's in my way. Still, I usually find my way around it and I really like the simplicity of having one small coil picking up both strings. I might recess it a bit into the aluminium and I might abandon it in favour of a more traditional pickup, but overall, I'm quite satisfied.

BTW, I also made two tuning screws from ordinary screws fixed in oak dowels with epoxy glue. They have just adequate friction against the fingers, but they'll have to do until I get a couple of knurled nuts. Still, compared to using a screwdriver when tuning, it's a great improvement.

Monday, 9 February 2009

A magnetic pickup

Previously, I've talked much about piezo pickups. I had great expectations to piezo discs, because they would give me more freedom in construction, since I would avoid having to make room for traditional magnetic pickups. I still have expectations, but so far, I've not been successful in making or buying a suitable pre-amplifier. I've tried a couple of designs, but none have sounded very good so far.


For the sake of my own motivation, I took a little detour from the piezos and put a guitar humbucker on top of the strings. The distance between the two rows of pole pieces is 18 mm - exactly the distance of my strings. This makes it possible to mount it lengthwise over the strings. It gives acceptable sound, but the mounting bracket doesn't integrate well with the overall design idea of having a sleek stick for a bass.

On the other hand, it _does_ have a certain rustic honesty about it. And most important: now I can play the bass and get a decent tone, while I figure out if the neck should be a little thinner, rounder or narrower. As well as many other things.

Tuesday, 3 February 2009

Wooden sides

I made two wooden sides from some spruce, just to test how it worked. Also to avoid messing up my good mahogany plank with early mistakes. I routed the cavities for saddles, nuts, strings and tuners with an ordinary plunge router in a table. I have little experience routing, but the cavities do what they're supposed to.

I've tried to make the sides fit tight against the top flange by having the holes in the vertical flange just a tad higher than those in the wood. This way, when I screw it together, the screw tightens the wood sides towards one another as well as lifting them against the top flange. It works ok... if you see gaps, it's because the wooden sides are made quick'n'dirtily, not because there's something wrong with the principle itself ;-)

I'll be sticking with the spruce sides for a while. There's a lot of things that I am yet going to try out - and which will need holes drilled in the wood. The mahogany sides will have to wait until I've settled on a final design. This especially includes whether to make the neck thinner. It feels a bit too thick even for my big hands, so I might slim it down from 4 to 3,5 cm (that's from 1.6 to 1.4 inches). That will still be much thicker than a traditional bass neck.

Thursday, 22 January 2009

New tuners

I've always wanted to try out my a particular form of tuners for headless guitars and basses. They work by having a scew pulling a brass block in which the ball end of the string is mounted. The main inspiration was Jeff Turpin's tuners; drawings and building guide for similar tuners can be seen at ScottyD's home made tuners. But since I have a T-beam, I can do away with the housings for the brass blocks that these designs use, and rather let them slide on the underside of the T-beam like this:

Two of the screws are for holding the brass plate on to the T-beam
The other two are for tuning.


I thought that 'd give it a try since I was going to cut the T-beam to length and I needed a bit of room for the tuners, so it was the last opportunity to try it out. It works very well - very smooth and precise, so I'll stick with them rather than reverting to the traditional tuners. I believe they'll be even better when I've mounted hex socket screws so I won't have to use a screwdriver to tune them. The holes where the strings go through the top flange could use some lengthening as well, which would make the strings' movement easier.


The picture shows the sharp turn, which the cable has to do going through the flange.

I'll stick with the new tuners rather than the standard bass tuners it had on earlier. That will also make it easier to make some good looking wood sides for the T-beam since I won't have to worry about making room for tuners that stick out. The brass blocks and string ends will be hidden within the body.

Earlier, while the traditional tuners were still on the bass, I was making and mounting a string tree that I needed for them. Unfortunately, the aluminium is so soft and sticky, that I broke off one of my threading taps inside the T-beam. Trying to get it out by cutting room around it with a dremel only made things worse. I'm afraid that I'll have to stray from my "form follows function" principle and make some sort of ornament to cover the damage, now that I don't need the string tree any longer.

Headstock-end with damage from string tree mounting attempt
(I later turned the T-beam around so this end was the bridge end back then).


On the image above, btw, you can see the strings going through the flange. They are secured on the underside by cable stops - the type used e.g. for brakes on mopeds.

Next step will be making the wooden sides plus some experimentation with Piezo pickup pre-amplifiers. And then back to tidy up the T-beam. Later, I am thinking about making a detachable body from steam bent plywood.

Sunday, 14 December 2008

Stick Bass Pictures

I've made the spine of the two-string, nylon string, fretless piezo alu T-beam stick bass. Now I have to stick some wood and some piezo pickups on it.

Some photos:

I will shorten bot ends of the T-beam down to the tuners and string holes. Btw, these are not nylon strings as originally described, but flatwound steel strings. I found out that the pull of nylon strings wasn't that much lighter than that of steel strings, so I went for these instead.

I've played it with a cheap non-preamplified piezo pickup on the flange. Sounded very good and feels very alive... I'll make some sound samples to go here. It even sounds good bowed. Plus it was easy to bow; since it only has two strings, they are easy to hit even though the fingerboard is flat (as in not being "radiused" like the fingerboard of e.g. a violin). So far, I am really, really satisfied with it.


Common bass tuners mounted in oak blocks. Bronze saddles through top flange. And yes, the saddles aren't completely perpendicular to the top flange. I'll mount them in slots in the top flange rather than in threaded holes, which will make it possible to adjust intonation. And then I won't have to worry about my crooked thread-cutting.

Action is ridiculously high at the moment, but if I set it lower, the strings don't press properly down on the saddles. I need a string tree, but I'll make it myself, since the strings are 18 mm apart.

Making the wood sides is next. Plus, I might trim down the "fretting" part of the neck to 25 mm (1") thickness. It feels too thick as it is now (4o mm). I was going to do that at some point anyway, but now I'll do it sooner rather than later.

The local staircase manufacturer kindly donated a nice piece of mahogany, and I've just bought a table-mounted circular saw. Plus, I am eager to use my router that I bought over a year ago and haven't used much. Making the wood sides should be a breeze.

Hope springs eternal.

Wednesday, 26 November 2008

Setting my sights a little lower

It can't have escaped anyone's attention that I haven't yet built the T-beam guitar. Even though I've talked a lot about it, nothing tangible has emerged. I've bought the components and there's nothing much missing. It's just a question of doing it.

So why haven't I made it yet?

It's mostly due to my busy life with a job and two small children. Yet other busy parents manage to build guitars, so there must be another reason. I've been thinking a lot about it and have reached the trivial conclusion that the T-beam guitar is too big a task for my limited experience. There are too many things that can go wrong in the process, and that's keeping me back.

I've decided that I need an easier task to gain some experience. A task that gives me a reasonable chance of success. This means that I'll have to lower my ambitions and - for starters - build something much simpler: A two-string, nylon string, fretless piezo alu T-beam stick bass. This is way easier than my original goal (a guitar with frets, tapered neck, pickup cavities, etc.), meaning that I might actually get it built.


The instrument minus acrylic body

The simplicity (and hence increased probability of it becoming a reality) of this new project in comparison with my original idea is due to the following factors:

Fretless because:
  • Fret, bridge and nut placement becomes less crucial or non-existing
  • I don't have to think about adjustability for intonation (lengthwise adjustable saddles)

Two strings because:
  • It is simpler than four strings.Whether or not to radius the fingerboard is not an issue.
  • Stig Pedersen of D:A:D plays a two string bass ;-)
  • I will be using the same basic design as e.g. Krappy Guitars and Longbow. This means that the neck won't have to taper towards the nut, which in turn means that I can use a standard T-beam and only cut it to get the desired length.
  • The few times, I've played a bass, I've mostly used the two low strings.

Nylon strings because:
  • I like playing nylon strings
  • They put little tension on the neck, meaning that I don't have to install a truss rod.

A bass because
  • I want to build something simple, and a two string guitar doesn't appeal to me.
  • I don't want a fretless guitar. At least at present, I want my guitars to have frets and six strings.
  • I don't have a bass, and I could use one. There's a good chance I might actually play it.
  • I believe the human ear to be less sensitive to tonal precision in the low register. Therefore, fretlees is a more nearby option for basses than for guitars. On a guitar, it would be very, very obvious if a tone was even slightly off, whereas on a bass, your ears would be more error-tolerant. On a bass, there is a larger margin. And I can use that ;-)

Piezo pickups because
  • It will serve as a testbed for my preamp/buffer experiments (thought I might swap some components when using them for guitars rather than basses)
  • I want to be able to use nylon strings, and a magnetic pickup won't pick them up (unless they have steel cores, which would increase neck tension)
  • I can use a much narrower T-beam than if I'd have to make room for traditional pickups and still avoid the top flange of the T-beam being completely intersected by the pickup cavity. Narrower means being able to use a standard 60 mm aluminium T-beam.

Alu T-beam because
  • It gives me practice in building T-beam guitars, which is what I set out to do in the first place.
  • It gives me the opportunity to experiment with mounting the piezos in different wood species on the quarter circle neck "sticks" (e.g. maple and mahogany).
  • Using semi-hollow wooden "sticks", it allows for wiring and piezo placement in an enclosed space everywhere on the bass (headstock included)
  • It gives me a reasonably hard fingerboard surface (depending on the alloy and temper), which is important with fretless instruments.
  • The considerable thermal expansion and contraction of aluminium doesn't ruin intonation when the bass is fretless. On a fretted instrument, this is a problem. This makes aluminium a more suitable building material for fretless than for fretted instruments.

A stick (with detachable body) because:
  • I believe that the body dampens the strings and reduces sustain. It's not so much the guitar body itself, but the fact that it rests on the player's torso and the player's arm rests on it. If you isolate the body from the neck (or "stick"), it will be able to vibrate more freely and without damping.
  • It also allows a lot of freedom in designing bodies with ergonomics or looks in mind. The stick remains, but you can swap body according to your playing style and physique. Or your mood, for that matter. Plus, you can experiment with many different shapes and materials for the body. You can have a guitar body designed for seated playing and one for standing up. One for resting the guitar on your left thigh, and one for resting it on your right, depending on preferences.

That's a lot of reasons to build the thing. Some are better than others, but overall I believe the project to have a good chance of success.