Sunday 11 November 2007

More beating around the bush

As I describe here, things have slowed down considerably since this summer. It quite typical to me (and probably many others), that planning is easy, but when I get to the point of actually making the things I've been planning, the progress goes down.

In the meantime, until I get the motivation for taking the T-beam guitar some steps further, I might as well plan even more. ...and consider alternative methods for future guitars.

One of the issues I prefer to think of is the possible tuner systems for headless guitars. On Building the Ergonomic Guitar, there's much discussion around how to make a headless tuner system. See e.g. here and here.

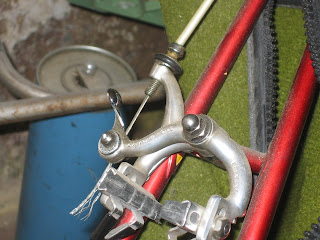
I'd like to add another possible principle to the discussion: Using a bicycle brake cable tensioner. It is normally used to tighten the brakes of a bicycle by turning the nut with the rubber ring seen here (click the images for a better view). Since the threaded, cylindrical part of the tensioner has a flat area which fits a hole of the same shape in the brake arm, it will not turn (but only slide) when the nut is rotated. On a bicycle, as seen here , the outer cable stops at the tensioner, and the inner cable goes through it and is fastened on the other arm of the brake.

When using it as a guitar tuner, the string passes through the cylinder (the part with the outer thread) and the total of six tuners/tensioners should be mounted in a brace with six holes of the shape that allows the cylinders to slide, but not to rotate . By turning the individual nuts (the part with the rubber ring), the strings are tuned.

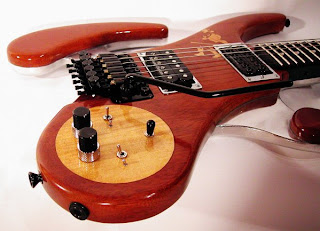
Of course, there's no need to use dedicated bicycle brake cable tensioners. It might be better to make the tuners from pieces of threaded rod with a hole drilled through them plus some knurled knobs such as these . Choosing three knobs of each of the two types shown in the picture would even allow for a staggered placement of the knobs, in turn allowing bigger knobs than with an in-line configuration.

I'd expect it to look like this.

It seems to me to be one of the simplest solutions to the problem of making cheap, accurate and reliable tuners for a headless guitar. I may have overlooked some problems with the principle, so prototyping must be the next step. Once I've finished the T-beam guitar.

Saturday 6 October 2007

The desired design expression of the T-beam guitar

Very early in the design process, I've had a quite clear idea of what the T-beam guitar will look like. I expect the combination of wood and aluminium to result in a very classic look. Not classic in the guitar sense, but rather in an automotive sense.

From when I was young, I've liked the steering wheels of old sports cars. This particular type of wheel had a body made from steel or aluminium with a wooden rim riveted to it.

English Walnut, © Mike Lempert, used with permission

To me, such a wheel was (and actually still is) one of the classiest single modifications, you could make on your everyday car. My then brother-in-law had a Nardi wheel of this type in his otherwise very ordinary Toyota Corolla. It was back before you had airbags and various controls in the steering wheel, so it was a relatively easy modification. All you had to mount on the new wheel was the button for the horn. I borrowed the car for a while and came to appreciate the wheel for its ergonomics as well as its good looks.

The essential thing of such a steering wheel - design wise - is the thick body of metal sandwiched between beautiful wood, often riveted to the body.

Bolivian Rosewood, © Mike Lempert, used with permission

This much talk about the steering wheels might lead one to believe that they will be the major focus of design. This is not the case; the wheels are just a great source of inspiration. I am not building a steering wheel themed guitar. I don't want people to think "steering wheel" when they see the guitar. But I am looking for the same design expression. The same expression which, by the way, can also be found in some knives with wooden handles.


© Donovan Govan, Chef's Knife, subject to GNU Free Documentation License, Version 1.2

Since the T-beam guitar is made from a relatively thick aluminium beam with body, neck and fretboard made from wood, it almost automatically will have the same type of look as steering wheels and knives described above. Still, there are things I can do to make the style of the guitar even more in the direction of "wood riveted to metal". For example, I plan on using brass discs for fret markers. This way, the markers will resemble the rivets holding the rim of the steering wheel. Also, I plan on using a fairly dark wood, preferably walnut - as on the steering wheel in the first of the above pictures.

I hope the above gives an idea of what I am aiming for. If it also explains why I expect the T-beam guitar to be phenomenally beautiful, I'll consider this attempt of explanation a success.

Wednesday 12 September 2007

In the meantime...

It's been a while since my last update. This is primarily due to other, more pressing tasks in life. I haven't done any work on the T-beam guitar, except from a lot of thinking.

In the meantime, I've made a modification to my old Squier Strat. Mostly because I am going to need a functioning guitar during the many months, I expect the T-beam construction to take. But also to get a feel at using a router on aluminium. Plus to try out the pickups, which I bought for the T-beam.


My modified strat with neck only, parallel, bridge only, series, parallel+counterphase and series+counterphase switching options.

The modification consists of an aluminium pickguard, the two Seymour Duncan single coil format humbuckers (a Little '59 for the neck and a Jeff Beck Junior for the bridge), a concentric pot for tone and volume plus a six-way rotary switch allowing combinations of serial/parallel and phase/counterphase pickup configurations.

First step was soldering wires to the six way switch. The wiring diagram can be seen here (go to "Switching between two humbuckers"). It took quite some time and was way less straightforward than it looks on the diagram. Not that it was difficult as such, but with 28 lugs (also counting those connecting to the pickups), there was quite a lot of wires crossing one another - and many possible mistakes to be done.

Next step was making the pickguard. I had an old piece of thin aluminium lying around, and I traced the contours of the original pickguard on it with a permanent marker. I also traced the contours of the screw holes and pickup holes except for the middle one. Rough cutting was done with a pair of tin snips. I used my new plunge router and a router table for the next step of shaping by putting the pickguard flat on the router table and by freehand letting the contour, which I'd traced on the aluminium, follow the router bit.


Routing the edges

This was followed by putting my belt sander on its back and smoothing the edges of the pickguard on the belt. The result was pretty nice, but I had to finish the edges with a small rotary tool to get them sufficiently smooth.Pickup holes were made by drilling most of the hole with an ordinary drill and following the above process - except for the belt sander - for finishing.

Not that shaping such a relatively thin sheet of aluminium gave me a lot of aluminium routing experience. The aluminium bars for the T-beam are ten times as thick and will be quite different to handle - but still... it gave me an idea of the amount of shavings, such a process produces. And I feel a little more confident routing the T-beam now. I'm still going to need more practice, though.


Fragile pickups repaired

Having finished the pickguard, I mounted the pickups, switch and concentric pot on it. I had to repair the pickups with electrical tape since their outer plastic shells had become loose. They were brand new, and I didn't drop them or treat them violently in any way, so it's a bit of a disappointment that Seymour Duncan makes such fragile pickups.

Almost finished, I soldered ground wires from bridge and jack. The knobs for the concentric pot had to be drilled in order to fit the pot shaft. I did so with a handheld drill, and I didn't drill completely straight, so the knobs are a bit skewed. I guess I should have been either a: more attentive, or b: using a drill press. I'll go buy me a drill press for the future.


Many wires on one switch

It gave a bit of trouble mounting the six way switch in the pickguard. After I mounted it, it was very hard to turn. After disassembly and assembly, it worked decently, but not completely smooth. It'll have to do for now, but I'll have to look further into it some day.

The sound is really good. I especially like the counterphase settings, which give a more bubbling and buzzy sound. Apart from a tendency not to work on the "bridge pickup only" setting unless wiggled a bit, the six way switch is very convenient.

The looks of the finished guitar is nothing particular. The creme colour of the guitar certainly does not match the aluminium pickguard very well. I could paint the guitar. Or cover the pickguard in brown or burgundy leather. I could even make a similar pickguard in copper.

There's lots of things, I could do, but I'd better start concentrating on the T-beam.

Wednesday 8 August 2007

The aluminium bars have arrived

The flat bars of aluminium, which I ordered, have arrived. If I arrange them as a T-beam and add the other components I have already bought, it looks like this.


The guitar is almost complete, right? All that's lacking is some wood.

Not exactly. I can see the following steps ahead of me:

  • Plan exact geometry of the T-beam.
  • Decide/calculate placement of bridge and pickups
  • Cut and route top flange
  • Cut and route bottom flange
  • Bolt and epoxy glue the two flanges together.
  • Cut fingerboard and epoxy glue it to top flange.
  • Mount frets.
  • Design and make locking nut from a piece of brass.
  • Level and dress frets.
  • Drill holes for bridge and mount bridge
  • Put on strings, test how much too high the action is.
  • Route recess for lowering bridge.
  • Cut wood for neck and body
  • Sand wood parts
  • Stain and oil wood (I'll probably use spruce for the first version, but I'd like it to look like walnut).
  • Mount wood parts.
  • Wire electronics (pickups, pots and jack).
  • Mount electronics.
  • Mount strings.
  • Play.
  • Adjust.
  • Play some more.
  • etc...
If you can think of anything that I've left out - or a better sequence of steps - please let me know. I haven't been explicit about it in my earlier posts, but I've never built a guitar before.

I guess it'll take more than just a couple of months before this can actually be called a guitar. That's all right. I'm not in a hurry.

Sunday 5 August 2007

Visionary lutherie

The other day, I stumbled upon an interesting and very inspiring website: KTL guitars . It is run by a Norwegian luthier, Knut Tore Ljøsne, who builds a number of very different guitars - different from one another as well as different from all the rest.

In an earlier post, I wrote about the possibility of using traditional tuners behind the bridge and having the strings go through the top of the guitar. Knut Tore actually did that on his Evil Axe guitar. He reports some tuning stability problems, but thinks that without a vibrato arm (which the Evil Axe has), it would be pretty simple to make it work properly. Since I've never been particularly fond of vibrato arms and don't intend to have one on the T-beam, that makes his approach very usable for a possible future guitar of mine (the first version will use a Schaller fine-tuning bridge).


Close up of the Evil Axe's tuners, copyright Knut Tore Ljøsne, used with permission

The Evil Axe is a remarkably beautiful instrument. Especially since everything on it - the arm rest, the horn for the strap, the two horns making up the thigh support - are there for a purpose (yes, I am a form follows function guy). It has no fancy elements "just for decoration" - perhaps except for the Strat-headstock-esque end holding the tuners, which nevertheless looks brilliant.


Evil Axe guitar, copyright Knut Tore Ljøsne, used with permission

Another of Knut Tore's guitars is the Magnum 648, Which is a lot more futuristic in its design. The body is made from a combination of wood and aluminium. Like the Evil Axe, it is a headless guitar, but it uses a Floyd Rose bridge instead of the Evil Axe's traditional tuners. Knut Tore has used an ordinary hand held router and woodworking routing bits for the aluminium part - just as I intented to do on the T-beam - and has kindly provided a couple of tips and tricks, which I look forward to employing when I start metalworking myself.


Magnum 648 , copyright Knut Tore Ljøsne, used with permission

Knut Tore's approach to guitar building involves a lot of computer modelling before the actual build. This allows for the wide variety in his guitars, since there is a greater probability that a guitar with a new design will actually sound good. Without modelling - or a very good ability to predict the acoustic characteristics of a new design - most luthiers are confined to more or less using the same proven formula for every guitar they build.

There are other very visionary and beautiful (and beautifully sounding) guitars on Knut Tore's website. I've just mentioned the two, which have most things in common with my own project. Go have a look.

Saturday 28 July 2007

Making my own T-beam

As mentioned earlier, I've had an unexpected hard time finding a suitable T-beam. There are lots of them available, but none wide enough for me to make holes for the pickups without intersecting the top flange completely.

For now, I have given up on finding a T-beam, and I will be making my own. It will consist of a 120 mm (4.7") wide and 10 mm (0.4") thick flat bar of AlMgSi0,5, also known as 6063 Aluminium, which will act as the top flange of the t-beam. The vertical part of the T will be a 30 x 10 mm (1.2" x 0.4") AlZnMgCu 1,5 (aka 7075 aluminium).

6063 is a fairly soft aluminium which should make it fairly easy to shape the neck, make holes for the pickups and make a recess where the bridge will be (otherwise the bridge will be too high). I've heard that it is so soft that it can be difficult and "gummy" to shape, but I could't get a piece of 6061 Aluminium, which was my preferred alloy. We shall see how much of a problem it'll pose.

7075, on the other hand, is very hard and strong, which is nice because the vertical flange will have to withstand the pull of the strings. It will be more difficult to drill, saw and file, but fortunately, the shaping needed on this bar is much simpler than on the top one.


I plan to join the two bars with screws and two component epoxy adhesive.

I ordered the bars yesterday, so now it should only be a matter of days before I can get going. All in all, I'm quite satisfied with the solution. I'd have preferred a "real" T-beam, but this solution allows me to have a stronger alloy where it really matters: The bottom flange.

Friday 13 July 2007

A different tuner system for headless designs

The guitar I'm planning at the moment might be the first in a series. If it turns out well and the building process is fun (the planning sure is), I expect to build another one. And probably then another. And so on. If the guitar turns out sounding horribly and/or the building is hell, I guess that'll be it. But that hasn't happened yet, so for the moment, I'm happily planning features for future models.

As mentioned earlier, I've settled for the Schaller fine-tuning bridge for the first version of the T-beam. This will avoid a number of potential problems and make the construction more straightforward. I am fine with that. For the next version, however, I have a sleek and efficient tuner design in mind.

The system consists of six arms mounted with one end on a shaft below the top flange of the T-beam. Approximately two thirds to the far end from the shaft, the string attaches to the arm (after going over the bridge and through a hole in the top flange) and is secured either by its ball end or by a screw. The latter solution will allow me to use the ball end at the nut, eliminating the need for a locking nut.

For each arm, a screw is mounted through the top flange. The end of the screw presses down on the arm. Tightening the screw results in pressing down the arm and tightening the string. If the aluminium is strong enough, the threads will be made directly in the top flange. If not, I'll insert some threaded steel or brass bushings.


The picture shows the guitar with one arm only. It is supposed to have six - one for each string.

By selecting steeper or shallower thread for the screws or various lengths of the arm, one can decide how much adjustment is needed for a given change in tuning. An obvious idea is to have a greater ratio for the thicker strings, since it takes more force to tune them.

My rough measurements say that it takes about 4 mm (0,16 inch) to tune the string an octave. That means that there is lots of room for the travel of the arm, even with a relatively thin body.

The idea goes well with using a T-beam, since it uses the top flange for mounting the arm and screw. But actually, I think it can be made as a modification for a wooden guitar as well - all you have to do is route out a cavity for the tuner system and mount it all on a steel or aluminium sheet.


Tuesday 10 July 2007

Alternatives to the T-beam

I've tried quite a lot of places to get the crucial component, the T-beam. It is more difficult than I originally expected. I've tried a couple of scrap metal dealers and the leading Danish metal distributor. Plus a couple of web-based stores. No success yet. It's quite disappointing, especially since I thought that obtaining the T-beam would be the easiest part of the project.

Until I find the T-beam - *if* I ever do - I've been contemplating other shapes of aluminium for the "spine" of the guitar. One possibility is an aluminium flat bar, 100 mm wide and 20 mm (approximately 4 and 0,8 inches) thick. With it, I could make the neck in aluminium only (as opposed to the T-beam version, where the neck sides are wood).


It would look clean and probably give a more pure aluminium sound. It would also be very thin. But it would imply a much larger amount of metalworking than I'm comfortable with. Plus, it would be quite heavy. Good thing it's headless, otherwise it would probably be very neck heavy.

Perhaps worst of all, I'd have to abandon the feature you see on the back of the T-beam versions: A flange of metal sandwiched between wood. I had (or have... I haven't yet given up on finding a T-beam) great expectations for the looks of this particular detail, which would resemble old sports cars' steering wheels ...as well as some knife handles with the blade going through it.

The principle of making a full-aluminium neck that extends down to the bridge is not at all original. The guitar would more or less be a headless version of instruments like Electrical Guitar Company's Custom Guiar - which in turn seems to be based on earlier Travis Bean models, though it seems that the former has a wider piece of aluminium for the body, ensuring greater strength as the pickup holes do not completely intersect the aluminium piece.

The lack of originality takes some of the fun out of the project, but still, with headless neck and an ergonomic and very thin body, it still distinguishes itself enough from existing guitars to allow me to feel just a little like a pioneer.

Next week I plan to visit yet another scrap metal dealer. There might be a T-beam waiting for me there.


Monday 2 July 2007

On the cover of the Rolling Stone

Well, almost.

There is a very fine article about the T-beam guitar on Building the Ergonomic Guitar. Have a look - and be sure to check out the other articles as well. There is loads of interesting information on guitars and ergonomics.


Saturday 30 June 2007

Bridge and tuners for the headless design

Having settled on a headless design, one of the next questions was which bridge and tuners to use. A small number of bridges with built-in tuners already exist, e.g. the ABM or the Steinberger. Unfortunately, they are all fairly expensive, and it was a fun challenge to try to find a cheaper (and perhaps better) alternative.

One of the first ideas was to mount traditional tuners at the bottom as shown in my previous post "The Ergonomic Guitar". To make room for them all - plus the fingers when tuning - the bottom end of the guitar would have to be cut at a quite steep angle. That actually looks quite good and fits well with the idea, that the body should support the right arm (assuming you're right-handed). The T-beam can extend into the upper wing in an elegant way.

Unfortunately, the angle of the end of the T-beam had to be *very* steep to allow for room for all the tuners. An alternative would be to use string trees to guide the strings to each tuner - the strings would then spread out from behind the bridge as they do at e.g. the Kramer Duke (which happens also to be an aluminium guitar with the neck going all the way through).

To get a cleaner look and ensure sufficient downwards pressure on the saddles, one could improve this design by letting the strings dive down behind the saddles and continue on the backside of the guitar on to the tuners. To avoid to much friction when tuning, it would probably be necessary to use a very slippery material for saddles and for the material on the bottom, on which the strings rest.


On the picture, you can see that I chose to let the saddles rest directly on top of the T-beam instead of on a bridge plate. I assume it will improve sustain.

On Building the Ergonomic Guitar, a couple of headless guitars using Steinberger Gearless tuners have been described. Todd Keehn and Scott French have used them. Unfortunately, they both mount the tuners the way they're intended, meaning that the strings run on top of the guitars and into the tuners. That means that you'd have to reach to the back of the guitar and feel your way to the tuner in question. It works fine on a traditional guitar where the tuners are mounted on the guitar's head, but for a headless guitar, I believe it is not very practical.

If the Steinberger gearless tuners were mounted upside-down and the strings were routed below the surface of the T-beam (as in the earlier described idea with traditional tuners), the knobs would be on top of the guitar where you could see them. That would make for a clean design and improved usability.


The picture above shows the guitar (without the wings) using this configuraion. Furthermore, the separate saddles are replaced by a custom cut one-piece bridge made from TremNut or a similar low-friction material. That means that the bridge has a fixed intonation like the Les Paul Junior bridge and those on some PRS guitars. I like the idea of these bridges: The less separate parts, the better sound.

Besides Building the Ergonomic Guitar, The Project Guitar site - and especially the forum - has been a great source of inspiration and information. On the forum, a number of alternatives to traditional headless bridge/tuner combinations have been proposed. Among these, there were two, which I found especially interesting.

One of the regular posters had made his own tuners with separate saddles for a bass. With a little modification, this principle lends itself very well to the aluminium T-profile: You can mill six grooves for the tuners and saddles in the top flange of the T-beam - as shown in the picture below.


The knobs are in two planes, as this allows for bigger knobs and therefore easier tuning than if they'd all been in-line. That would be a really nice way of taking care of tuning. Unfortunately, I have almost no experience in metalworking (cutting the T-beam into shape is in itself a daunting task), so this idea will have to wait for later.

Another of the regulars at Project Guitar had used the Schaller 456 fine-tuning bridge for a headless travel guitar. The fine-tuners can't go very far, but he uses a string-mounting procedure with a pair of pliers and a locking nut, ensuring a sufficiently precise tuning when tightening the string with the pliers. The fine-tuners do the rest of the job. I've settled for this solution for the prototype of the T-beam, as it involves relatively little and uncomplicated metalworking as compared to the other solutions.

A very rough sketch looks like this:


I've bought the bridge (as well as some other components), so now that's settled. At least for the prototype. I'm especially keen on trying the Steinberger Gearless/TremNut fixed-intonation bridge combo on a later version. But as this is my first guitar project, I want to reduce the number of things that can go wrong, and the Schaller fine-tuning bridge offers a proven combination of bridge and tuning.


Wednesday 27 June 2007

Guitar Ergonomics

The classical Guitar

Back in the old days, before we had electric guitars, a guitar looked like this:


CC Martin Möller, Creative Commons Attribution ShareAlike 2.0 Germany, resized by me

It's beautiful and sounds nice, but it's not particularly easy to play.

There probably exists a number of very good reasons for this unhandy shape and size. Being totally acoustic, the guitar needed to have a large body. The tuners had to be at the end of the neck, as mounting them on the thin and acustically crucial soundboard would probably have been out of the question. Why the body had to have the shape of a rather large figure eight is beyond me. It probably has to do with acoustics, too. Alternatively, the reason mighe be that it makes it easier to rest the guitar on your thigh - and for symmetry reasons, the other half was shaped accordingly.

When technologies evolve, they often retain some of the drawbacks of earlier versions. Probably because many designers (and customers) are quite conservative and don't like things to depart too much from what already exists. Early automobiles, for example, resembled horse carriages to an unnecessary degree.

The Electric Guitar

I think the same effect is in play for the electric solidbody guitar. At least when looking at the most well-known brands and models such as Fender, Gibson and PRS. It still has a head at the end of the neck, even though it tends to make the guitar neck heavy and always hits other objects and people when you move the guitar around. It still has a rather large and thick body, though acoustics do not come into play any longer. It still has the shape of a fat figure eight, albeit with cutouts at one or both sides for easier access to the higher frets.

To me, the bottom cavity of the figure eight is in the wrong position: If i have it on my right thigh, it feels too much to the right and vice versa. A cavity located nearer the bridge would be more suitable, as resting the guitar on the right thigh would give a usable position. At least, so I think. Regarding the other inherited features from the classical guitar, I'd like a thin guitar allowing my playing action to be close to the body, a compact guitar with no head for knocking out the teeth of other band members, a light guitar that don't break my back.

The Ergonomic Guitar

Hence, one of the early decisions in the desigh of the T-beam prototype was to go for a headless and ergonomic design. On Building the Ergonomic Guitar, there is a lot of discussion on suitable shapes and design principles, plus articles on some of the smaller luthiers, who build ergonomic guitars. Especially the Klein guitar shape caught my attention: It simply looked like it would be easy and relaxing to play.


My design will be something like this. The exact shape of the wings may vary. I might experiment with several shapes and woods for the wings. But overall, this is what it will look like. I don't try to make it look like any particular one among the existing ergonomic guitars, but I think the Forshage electric guitar is the one it's going to resemble the most. The Forshage, in turn, is inspired by the Klein, BTW.

The picture of the ergonomic T-beam guitar is an older (i.e. around two months) design. I later abandoned having the traditional tuners at the bottom of the guitar in favour of a different desing, instead using a bridge with integrated fine tuners. More about these considerations in a later post.


Background - why and how

Over the last years, I've become more and more interested in building guitars rather than (just) playing them. I never got around to actually building anything, but I took a couple of guitars apart and put them together again. I also discovered, that people build guitars in aluminium (or aluminum, if you prefer). They sound great. I'd like to have one, but they're prohibitively expensive.

One evening a couple of months ago, when i was looking at metalnecks.com, which links to a lot of aluminium guitars, it struck me that the majority of guitars have wooden bodies with aluminium necks or aluminium bodies with wooden necks. There were comparably few one-piece aluminium guitars. And no aluminium "neck-through"-necks with attached wooden "wings" at all. That puzzled me a bit, because it seems that among luthiers using wood, the neck-through design is widely considered the best overall solution.

I tried to imagine how an aluminium neck-through-neck would look. It might be made from a single long slab of aluminium. That would be very heavy, so you'd probably route out some of the material along the neck like the Kramer aluminium neck. Then you'd get something looking a lot like an aluminium T-beam. You know, these metal beams used for load bearing parts of houses among other things.

Why not use a stock T-beam? That'd be way cheaper than having the neck made from a big slab of aluminium on a CAM router. I think it can be done in the following steps.

You start out with at T-beam, which will act as sort of a spine in the guitar. A top flange of 100mm, a bottom flange of 60mm and 5 mm flange thickness (that will be approx 4, 2,4 and 0,2 inches) will be suitable. They are available, but - as it should turn out later - not exactly readily available.


The T-bar is cut to shape (Pickup holes, neck and head). Due to the width of the pickup holes, the T-bar has to be quite wide in order to keep its structural strength. With a narrower T-bar, the pickup holes would completely intersect the top flange, weakening the T-bar considerably.


Having modified the T-bar, you screw or glue on wings (like on a wooden neck-through guitar), fingerboard and some pieces of wood to give the neck its desired shape. Plus, of course, route out cavities for electronics, sand the body, mount bridge, nut, etc, etc.


This way, you get a guitar with a lot of structural strength from the T-beam. You have great freedom of choice of wood and shapes of the body. And best of all: It should be possible to do it with ordinary do-it-yourself tools (hand held router, metal saw, sand paper, electric drill, belt sander, etc.).

I think it will work. I think it will look amazing. I am not sure how it will sound, but I am going to build myself one. Then we shall see. Or rather hear.

I'll post updates on this blog. I've already done some designing and planning plus a couple of purchases. This will be described in separate posts in the near future, and I expect that when I get around to the actual construction of the thing, my posting will have caught up, and I'll be posting in more or less real-time.