
The two-layer neck guitar is progressing further. Now, it's a very nice,
compact and well-sounding instrument. There are still improvements to
be made, but now that it's playable, I hope to play more and modify
less.
The neck is very flat (as Rick Toone's
Exoskeleton neck)
without any wood on the back. I might add a piece of wood to make the
neck thicker and more familiar, but for the time being, playing the thin
neck is fun and works surprisingly well. My thumb still creeps up over
the edge of the neck, and that's not the proper way to play it. As long
as you play with the "correct" classical grip with your thumb behind the
fingers, having a thin neck feels fast and precise.
I've mounted
two of my "current transformer" or CT pickups on the guitar. There's
not enough room underneath the strings for a traditional pickup. The CT
pickups work in the same way as Lace's Alumitone pickup: The
part beneath the strings is the primary coil, which is connected to the
secondary coil (the current transformer), which is at the side of the
main aluminium beam. Magnets are small cylindrical neodymium magnets
mounted in hex blind screws. Since there's only one or few primary
windings under the strings, such pickups can be made very flat. This in
turn allows me to keep the whole instrument rather thin, since I don't
need deep pickup cavities.

On my neck pickup, I use a brass coil with only one primary winding
(made from a 20 x 3 mm brass bar) connected to a secondary coil by an
iron core (the green florist's wire). The secondary coil is home made
using a sewing machine bobbin. The bridge pickup has about 15 primary
windings running through an AS-104 current transformer. They supplement
each other well, the bridge pickup being quite snappy and sharp, while
the neck pickup is more deep and soft.
Both pickups have low
impedance; in the range of microphones, which is why I am using an 500
ohm -> 50.000 ohm line transformer before plugging the guitar into my
amp.
Also added is a string retainer at the headstock end,
keeping the strings from rattling. A bracket for jack, volume pot and
two mini jacks for the pickups makes it easy to plug it into an amp and
to switch the pickups. For intonation, I've added a couple of screws to
the saddles going into the end piece that holds the tuners. By turning
the screws, the saddles are moved back and forth.
I still haven't
added piezo pickups, partly because I haven't figured out where to put
the pre-amp and controls, partly because the CT pickups function so
well.

Next step might be a thicker (6 mm rather than 4 mm)
plastic body, this time bent with a little more care. The one I'm using
now has been bent into shape using a heat gun and brute force. Another
improvement could be a piece of wood on the plastic body that acts as
forearm support - the curve of the body makes it hug the torso of the
player (which is nice and gives good control of the guitar), but there's
nothing on which to rest my arm, and that becomes a bit tiresome.
There's only one aspect that I'm not quite satisfied with: The bow of the neck is not easily adjustable. This is due to the strength of the beams - even without tightening one against the other, the pair of them are enough to counteract the pull of the strings, so there really isn't much to adjust. A solution could be a thinner back beam, but I am not sure they are available in the necessary width.


 The two-layer neck guitar is progressing further. Now, it's a very nice,
compact and well-sounding instrument. There are still improvements to
be made, but now that it's playable, I hope to play more and modify
less.
The two-layer neck guitar is progressing further. Now, it's a very nice,
compact and well-sounding instrument. There are still improvements to
be made, but now that it's playable, I hope to play more and modify
less. On my neck pickup, I use a brass coil with only one primary winding
(made from a 20 x 3 mm brass bar) connected to a secondary coil by an
iron core (the green florist's wire). The secondary coil is home made
using a sewing machine bobbin. The bridge pickup has about 15 primary
windings running through an AS-104 current transformer. They supplement
each other well, the bridge pickup being quite snappy and sharp, while
the neck pickup is more deep and soft.
On my neck pickup, I use a brass coil with only one primary winding
(made from a 20 x 3 mm brass bar) connected to a secondary coil by an
iron core (the green florist's wire). The secondary coil is home made
using a sewing machine bobbin. The bridge pickup has about 15 primary
windings running through an AS-104 current transformer. They supplement
each other well, the bridge pickup being quite snappy and sharp, while
the neck pickup is more deep and soft. Next step might be a thicker (6 mm rather than 4 mm)
plastic body, this time bent with a little more care. The one I'm using
now has been bent into shape using a heat gun and brute force. Another
improvement could be a piece of wood on the plastic body that acts as
forearm support - the curve of the body makes it hug the torso of the
player (which is nice and gives good control of the guitar), but there's
nothing on which to rest my arm, and that becomes a bit tiresome.
Next step might be a thicker (6 mm rather than 4 mm)
plastic body, this time bent with a little more care. The one I'm using
now has been bent into shape using a heat gun and brute force. Another
improvement could be a piece of wood on the plastic body that acts as
forearm support - the curve of the body makes it hug the torso of the
player (which is nice and gives good control of the guitar), but there's
nothing on which to rest my arm, and that becomes a bit tiresome.


 On the bridge end, I plan to mount a "stick-and-screw" tuner system. The prototype shown here works decently. I imagine, that using a brass bracket rather than the aluminium one here as well as harder steel for the screw threads will improve that.


 Also added was a treble side horn, giving the player the option of resting the guitar at his thigh in a "traditional electric guitar" style. Unfortunately, the thigh support is now in the way of the flexible outer cables that went from the side of the body to the thigh support, so they had to go for the moment. I might relocate them to the other side of the body.
 The coarse tuners that I made for the black SG with the Schaller fine tuning bridge were - after all - too troublesome to string and adjust. I've made another attempt, this time consisting of

 The tuner works very well. The grooves and lid that you see on most
other headless slider based tuners aren't necessary, as the string pull
keeps the slider oriented lengthwise. When I get some tools for making
fine thread (M3 and M4 x 0,35), it'll be even smoother.
The tuner works very well. The grooves and lid that you see on most
other headless slider based tuners aren't necessary, as the string pull
keeps the slider oriented lengthwise. When I get some tools for making
fine thread (M3 and M4 x 0,35), it'll be even smoother.
 It is common among some luthiers to give their guitars a name. Since it's a testbed, and bed is called Lectus in latin, I'll call it Lectus Testus. Yes, it's rubbish latin, I know. And yes, it might actually mean something different.


 Got the steel box straightened and reinforced plus the arm rest, leg support and strap horn carved from scrap mahogany. It's all in a very rough state, but I expect it to be ready for neck, bridge, tuners and pickup in a week or so.
 So far, so good. Unfortunately, that put quite a bow in the box profile. I didn't count on that (only thought wood behaved that way), but I suppose that's part of learning.
 After postponing it a number of times, I cut off the strat headstock of my very fine Warmoth neck. That took a bit of self persuation, but I needed it headless. A brass angle bracket is holding the strings. I also made a new acrylic body. This time, I tried to make it really fit my torso. I tried too hard: Most of the curves and shapes are too pronounced and it's actually too tight on the body.
 The strat type hardtail bridge that's on the developing testbed guitar was in many ways a temporary solution. Tuning lacked smoothness and precision with the strings going through the holes in the bridge plate on their way to the tuners. Also, it looked out of place - being chrome plated as well as being wider than the rectangular steel tube it was mounted on.
 Here's an instrument which I'd like to make some day:
 In the previous post, I described my intention of creating a playable testbed for experiments with different pickups. It turned out to be nice to play, so I improved it with a strap horn and the acrylic body from my t-beam bass. As it turned out, it was quite neck heavy. And since I prefer a headless guitar in most circumstances, I began to consider a tuner system down behind the bridge plus removing the headstock.
 I built a bracket for mounting them on the end of the testbed guitar. It is soldered together from rectangular brass profiles. The profiles carrying the tuners are at an angle so that there's a (reasonably) straight string pull.
 had to do a bit of filing, and now the arrangement works, but less smoothly than the first time. I'm not completely satisfied, so I will buy a machine vise for my drill press and make a better bracket. That will give me a chance also to try some better tuners. They could be these due to their good looks (though it might look too _deliberately aged_ for my taste) or these due to their high gear ratio
 I have begun preparing a testbed for my experiments. I want something that's playable. It should be a proper guitar. But it should also be a proper testbed for new pickups, forearm support, strap horn and leg rest.
 Almost a year ago I mentioned the mahogany sides that I was going to make for the two string T-beam bass. They're coming along slowly, but they're far enough to be shown here.
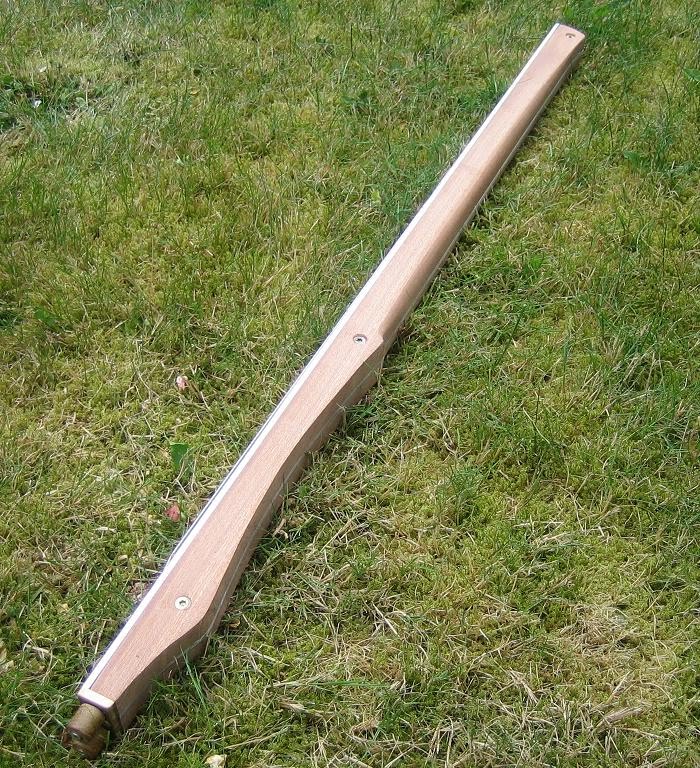 The lower bottom of the beam is curved in order to follow the shape of the acrylic body. I plan to make another body from a thicker (5 mm) piece of acrylic. It will look a lot like the current one but it is going to have two thigh rests like the Strandberg guitars, which gives a wider variety of playing positions.
 Next steps are routing a channel in each side for the sliding pickup bracket, sanding a bit more, and oiling the wood. I'd like to give the pickup bracket a more elegant shape than it has now, so I might do some cutting and filing here, too. Then there's the acrylic body. Knowing myself and the speed at which I work, the body probably won't be finished this summer.
 I've made a couple of additions to the switching system of my black SG. One of them is a series/parallel switch down by the tone and volume knobs - on the brass disc that leads the copper tubes into the control cavity. I also added a copper shield to cover the holes left by the original knobs and switches. It's still quite fresh and pink, and looks a bit out of place, but I expect that once it has oxidised a little it will turn a more brownish hue and blend in nicely with the rest of the metal.
 The black SG that I used for experiments with coarse and fine tuners has been modified further. I wanted to be able to phase switch the pickups. Plus, I'd had this idea of having the cables run in copper tubes to shield them from noise. The copper tubes should be on the face of the guitar rather than running inside the body. Each switch or knob should be mounted in its own separate hole with copper tubes running to and from it.


