Thursday 30 December 2010

New tuner design

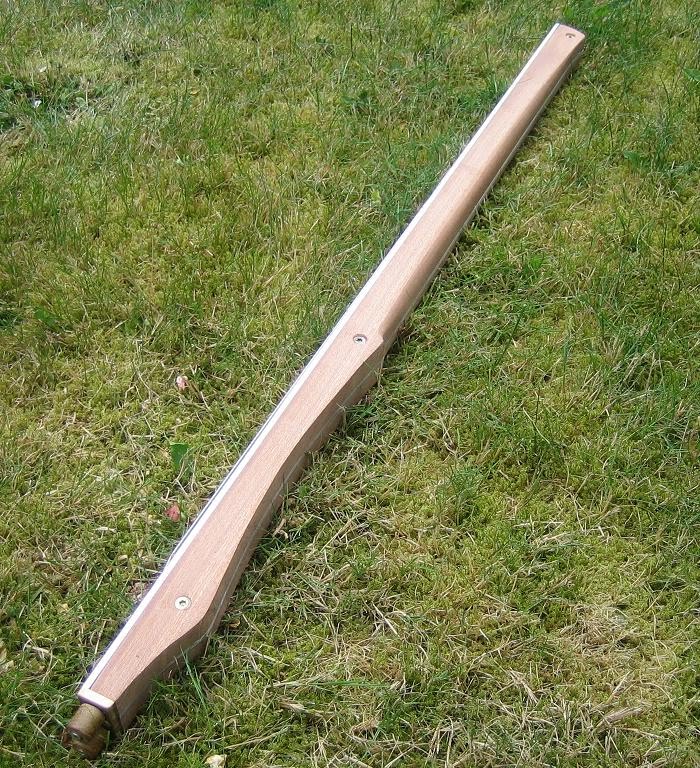
In the previous post, I described my intention of creating a playable testbed for experiments with different pickups. It turned out to be nice to play, so I improved it with a strap horn and the acrylic body from my t-beam bass. As it turned out, it was quite neck heavy. And since I prefer a headless guitar in most circumstances, I began to consider a tuner system down behind the bridge plus removing the headstock.

The design - as many others - uses traditional tuners mounted at the end of the guitar. Most of the existing designs however, has the strings fan out from the bridge and onto the tuners. The tuners have a lot of distance between them in order to allow room for the fingers when tuning. One solution is a design using two rows of three tunes facing each other and sharing the same slot. For the latter, I bought a set of six twelve-string tuners (they have the pegs closer together than six string tuners, saving space).

I built a bracket for mounting them on the end of the testbed guitar. It is soldered together from rectangular brass profiles. The profiles carrying the tuners are at an angle so that there's a (reasonably) straight string pull.

The tuners are made from one side of the twelve string tuners, cut in half - i.e. 2 x 3 tuners. I found out that they had a nice copper coating beneath the crome, so I filed away some of the chrome. I hope, when the steel and copper oxidizes, that they will look more discreet. They seem to work decently, but I imagine that better quality tuners might improve the system somewhat.

The strings can be tuned easily and precisely. Mounting the strings is a bit troublesome, but will probably be easier when I've tried it a couple of times. Unfortunately, my soldering job was insufficient and the top plate broke off. When I re-soldered it (and bolted it too, to be on the safe side), I was too hasty, and the holes for the pegs didn't line up. I had to do a bit of filing, and now the arrangement works, but less smoothly than the first time. I'm not completely satisfied, so I will buy a machine vise for my drill press and make a better bracket. That will give me a chance also to try some better tuners. They could be these due to their good looks (though it might look too _deliberately aged_ for my taste) or these due to their high gear ratio

If they keep working well, I'll cut the headstock off the neck, but for now I am anchoring the ball end of the strings in the existing tuner pegs on the headstock. I plan to play it for some time and make sure that it's a keeper (the overall design, not this particular version). I've got to be certain this works before chopping away.

Monday 29 November 2010

The developing guitar

I have begun preparing a testbed for my experiments. I want something that's playable. It should be a proper guitar. But it should also be a proper testbed for new pickups, forearm support, strap horn and leg rest.

It's built from a warmoth strat neck and a piece of 20 x 60 mm rectangular steel tube.

For now, it has a tele style six saddle bridge, but that might be replaced by one of my own designs. It also has traditional tuners in the headstock. I'd like it to become headless at some point, perhaps utilizing the bridge and coarse tuners of my SG experiments. But for now, I haven't developed a headless tuning system of sufficient quality. Plus, it's such a fine neck and I'd hate to cut it.

It's a Warmoth strat superwide wenge neck with a pau ferro fretboard and stainless steel frets. I bought the neck because I have very big hands and I'd like to try if a wider neck made better room for my fingertips at the fretboard (it did, but I think it's a bit _too_ wide). I'm not yet skilled (or courageous) enough to attempt building a playable, fretted neck, so I thought it wiser to buy one.

The design of the ultrawide neck with its overhanging fingerboard at the body end makes it fit the steel tube nicely.

The pickup is my own design. It is inspired by the Lace Alumitone and a thread on the guitar electronics forum. More on that and other pickups in a later post. The distance between the strings and the steel tube allows for easy swapping of pickups, as long as they're not too thick (which mine aren't).

I'm planning to make a strap horn, forearm support and leg rest from scrap mahogany. That'll make it a playable testbed, allowing me to try out new pickup designs, exploring their abilities while having fun playing. Other parts, such as bridges and other shapes of forearm support etc, can be easily replaced as well.

The interchangeable wooden body parts are inspired by Spalt Instruments.

Sunday 25 July 2010

Mahogany sides for the T-beam

Almost a year ago I mentioned the mahogany sides that I was going to make for the two string T-beam bass. They're coming along slowly, but they're far enough to be shown here.

The main thing is the added mahogany sides. But another thing I've done is rounding off the corners and edges of the T-beam and tuner plate. It makes it look a bit more friendly and playable without the sharp edges.


The lower bottom of the beam is curved in order to follow the shape of the acrylic body. I plan to make another body from a thicker (5 mm) piece of acrylic. It will look a lot like the current one but it is going to have two thigh rests like the Strandberg guitars, which gives a wider variety of playing positions.

I used a surform rasp, belt sander and sand paper. Plus a table router for the inside cavities for tuners, saddles, etc. On the bottom image, you can see burns and tearoffs from the routing, but luckily they're hidden when the bass is assembled. I also bought a spokeshave, but found it difficult to use. I'm slowly getting better at using the tools, but there's a long way to go before I'm going to be really satisfied with my craftsmanship.

Next steps are routing a channel in each side for the sliding pickup bracket, sanding a bit more, and oiling the wood. I'd like to give the pickup bracket a more elegant shape than it has now, so I might do some cutting and filing here, too. Then there's the acrylic body. Knowing myself and the speed at which I work, the body probably won't be finished this summer.

Monday 15 March 2010

Copper shield and switch added

I've made a couple of additions to the switching system of my black SG. One of them is a series/parallel switch down by the tone and volume knobs - on the brass disc that leads the copper tubes into the control cavity. I also added a copper shield to cover the holes left by the original knobs and switches. It's still quite fresh and pink, and looks a bit out of place, but I expect that once it has oxidised a little it will turn a more brownish hue and blend in nicely with the rest of the metal.

At present, the shield is only fixed by the nut of the tone and volume pots. I'm still contemplating wheter to use a few screws like on the brass shield or - which would look interesting - a lot of small brass tacks along the edge.

Monday 1 February 2010

Exposed cabling in copper tubes

The black SG that I used for experiments with coarse and fine tuners has been modified further. I wanted to be able to phase switch the pickups. Plus, I'd had this idea of having the cables run in copper tubes to shield them from noise. The copper tubes should be on the face of the guitar rather than running inside the body. Each switch or knob should be mounted in its own separate hole with copper tubes running to and from it.

Apart from shielding the wires, I thought it'd look good. And not only good, but also logical. I want to be able to see what's happening with all the switching... to know which pickup is going to what swith and from there to which pot. That way, swithcing would be more transparent. You can't see how the wires go to and from a six way selector switch beneath a strat pickguard, and I missed that. The six-way switch is easy to use, but leaves you clueless as to what is hapenning inside the control cavity.

So I made a phase switching system for the black guitar. Each pickup goes to its own On/Off/Counterphase switch on the upper horn, and from there, they both go to the control cavity. Each switch is mounted in a brass disc. If I should keep true to my principle, I'd have to also mount the tone and volume pots like this, but I'll stop here. I expect that on a future guitar, I will fully implement the copper tube and separate switches/pots design. For now, I'll stick with it as it is.

It looks pretty much as I expected it to. I like the... "functional steampunk" look of it, though I use the word with some caution. There's quite a lot of the steampunk design aspects, that I like ...the combination of wood, brass and copper, for instance. Still, I think that steampunk has become too much about old-fashioned costumes and glueing cogs and sprockets on top of things. And then spraying them with copper. I wouldn't add anything just for its ornamental value. It has to have a purpose.

Opinions are welcome, constructive criticism even more so.